A three-storey, three-bedroom house with a rooftop mini pool on a subdivision lot of 1,769.63 sq ft – and the specific design and procurement decisions that kept a house of this size inside a modest budget.
By Eng. Rajmohan Rajragavan, Director · Reviewed by the Structa design and MEP team
Published: 11 August 2026 | Last reviewed: 11 August 2026 | Reading time: 14 minutes
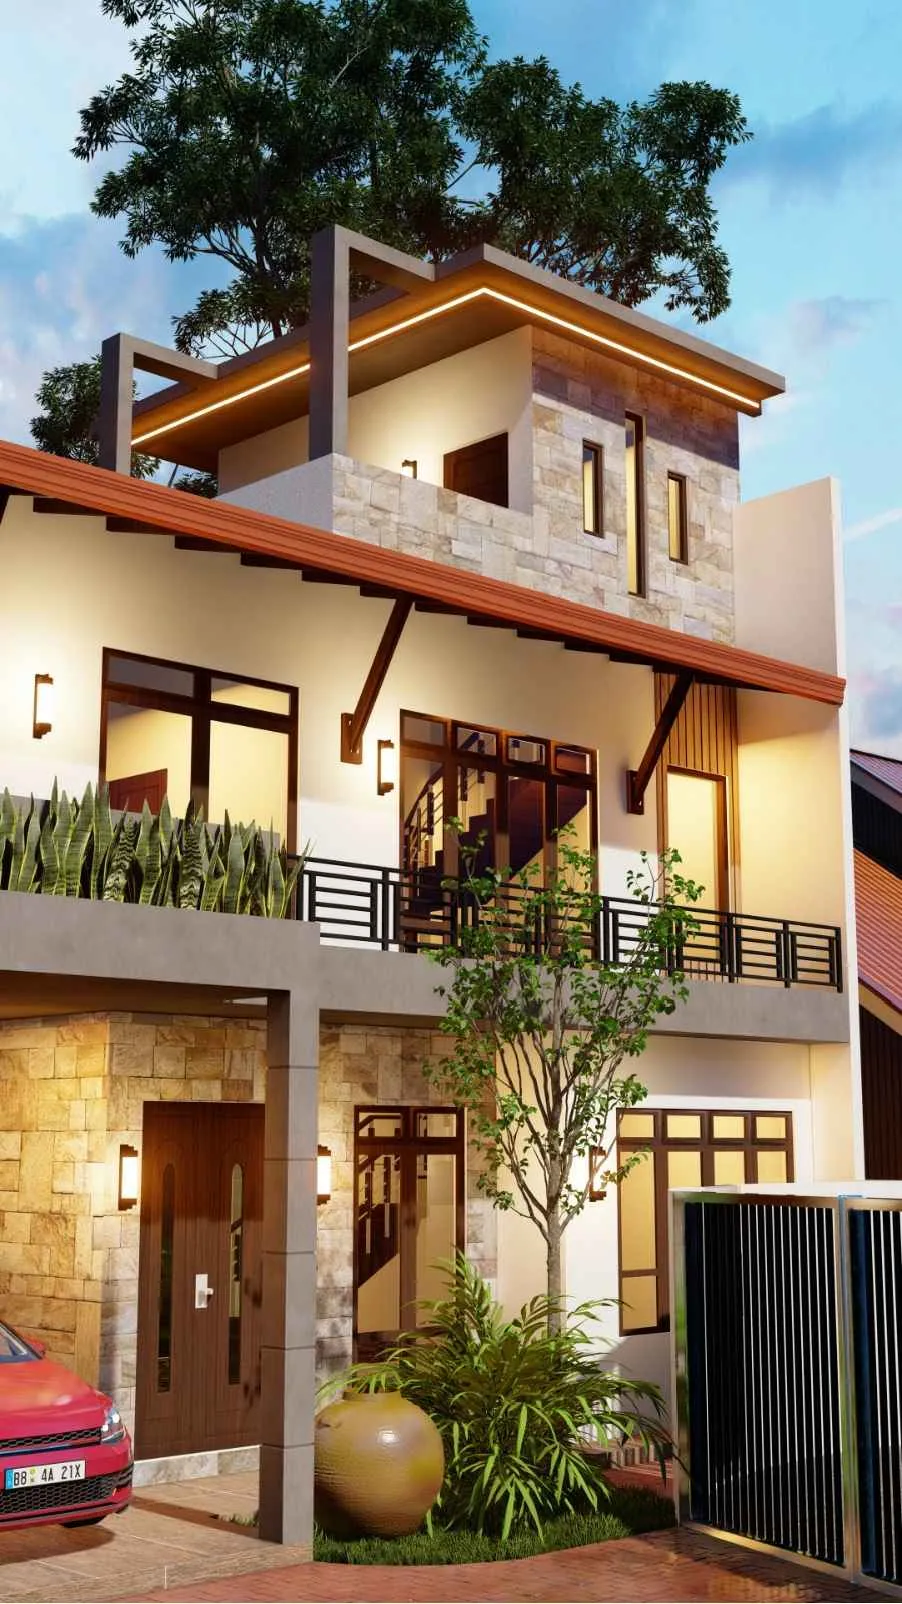
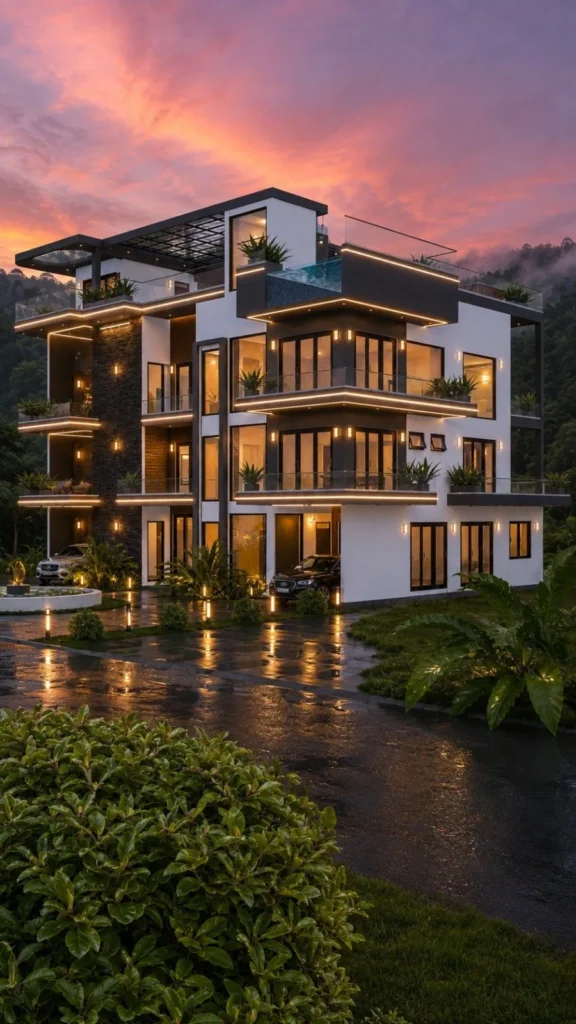
Figure 1. The completed design seen from the approach road. Three occupied levels plus a rooftop terrace, on a plot measuring 6.5 perches with neighbours hard against three sides.
The project at a glance
| Recorded on the drawings | Value |
|---|---|
| Location | Lot 8, Mawal City Project, Diyagama Village, Homagama, Colombo District, Western Province |
| Approving authority | Pradeshiya Sabha limits of Homagama |
| Land extent | 6.50 perches (1,769.63 sq ft) |
| Access | 10 to 12 ft wide internal subdivision road |
| Ground floor | 1,214.25 sq ft |
| First floor | 1,263.35 sq ft |
| Roof terrace (usable) | 879.78 sq ft |
| Total plan area | 3,357.38 sq ft |
| Floor area to land ratio | About 1.9 times the plot area |
| Building height | 32′-6" to cover slab level |
| Floor levels | Ground +1′-0" · First +11′-6" · Roof terrace +22′-0" · Cover slab +32′-6" |
| Sleeping rooms | Three, one at ground floor level with attached bathroom |
| Bathrooms | Three, all en-suite |
| Kitchens | Dry kitchen and separate wet kitchen |
| Survey plan | Plan No. 7471, a resurvey and subdivision of Lot 2B in Plan No. 5284 dated 25 February 2021; land called Sambuddhi Gorakagahawatta, Udugaha Pattu of Salpiti Korale; surveyed 21 June 2022, subdivided 23 June 2022 |
| Parent land extent | 0.1447 hectares (0A. 1R. 17.25P), subdivided into nine allotments – Lots 1 to 8 and R1 |
| Drawing set | SEC-1634, revision 01, dated 10 July 2026, scale 3/16" = 1′-0" |
| Drawings issued | 10 architectural sheets and 10 electrical and plumbing sheets, plus a priced BOQ |
One number in that table is worth pausing on: the total floor area is roughly 1.9 times the area of the land it stands on. That ratio is what a 6 perch plot demands. A single-storey house of the same accommodation would need three times the land, and land at Diyagama is the most expensive line in the client’s budget – more expensive per square foot than anything we could build on it.
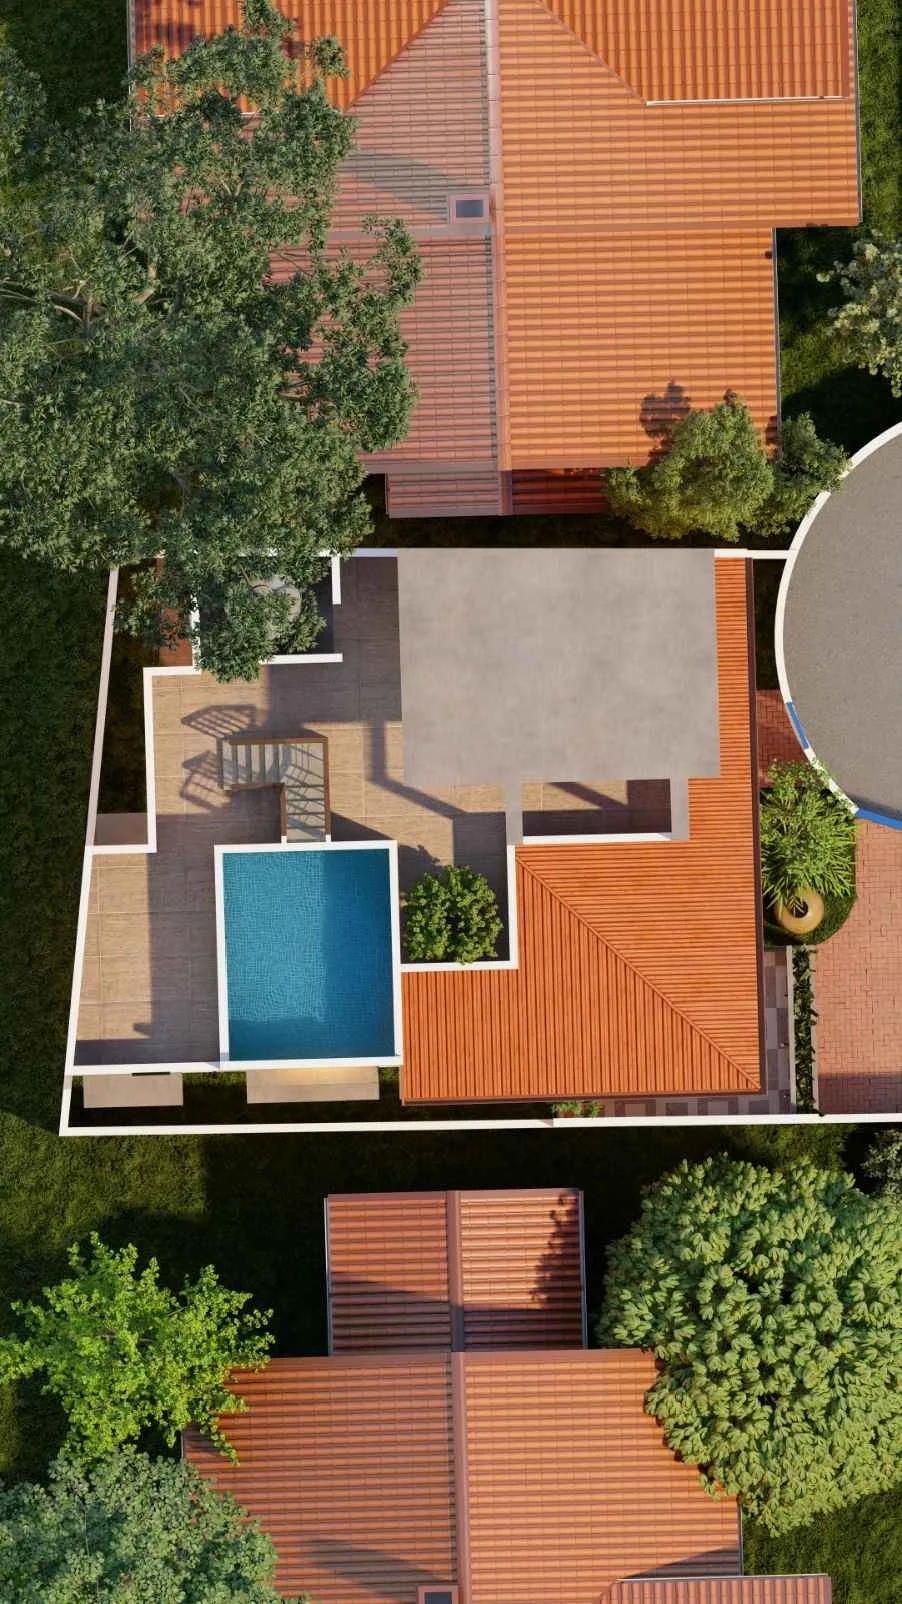
Figure 2. The aerial view shows the whole strategy at once: the footprint reaches the boundaries on three sides, the pitched roof covers the front block only, and the rest of the roof is occupied terrace with a pool set into it.
Document 01
The survey plan: reading a 6.5 perch lot before you design
Every project starts with the survey plan, and on a small subdivision lot the plan tells you almost everything about what is possible before a single line of the house is drawn.
This land is Lot 8 in Plan No. 7471, a resurvey and subdivision by a Registered Licensed Surveyor of Lot 2B in an earlier plan of 2021. The parent land – 0.1447 hectares, or 0A. 1R. 17.25P – was cut into nine allotments, Lots 1 to 8 plus a reservation, arranged as a single row along an internal road. Lot 8 is 6.50 perches. Its immediate neighbours, Lots 6 and 7, are also 6.50 perches, and the row runs from 7.00 perches at one end down to 6.40.
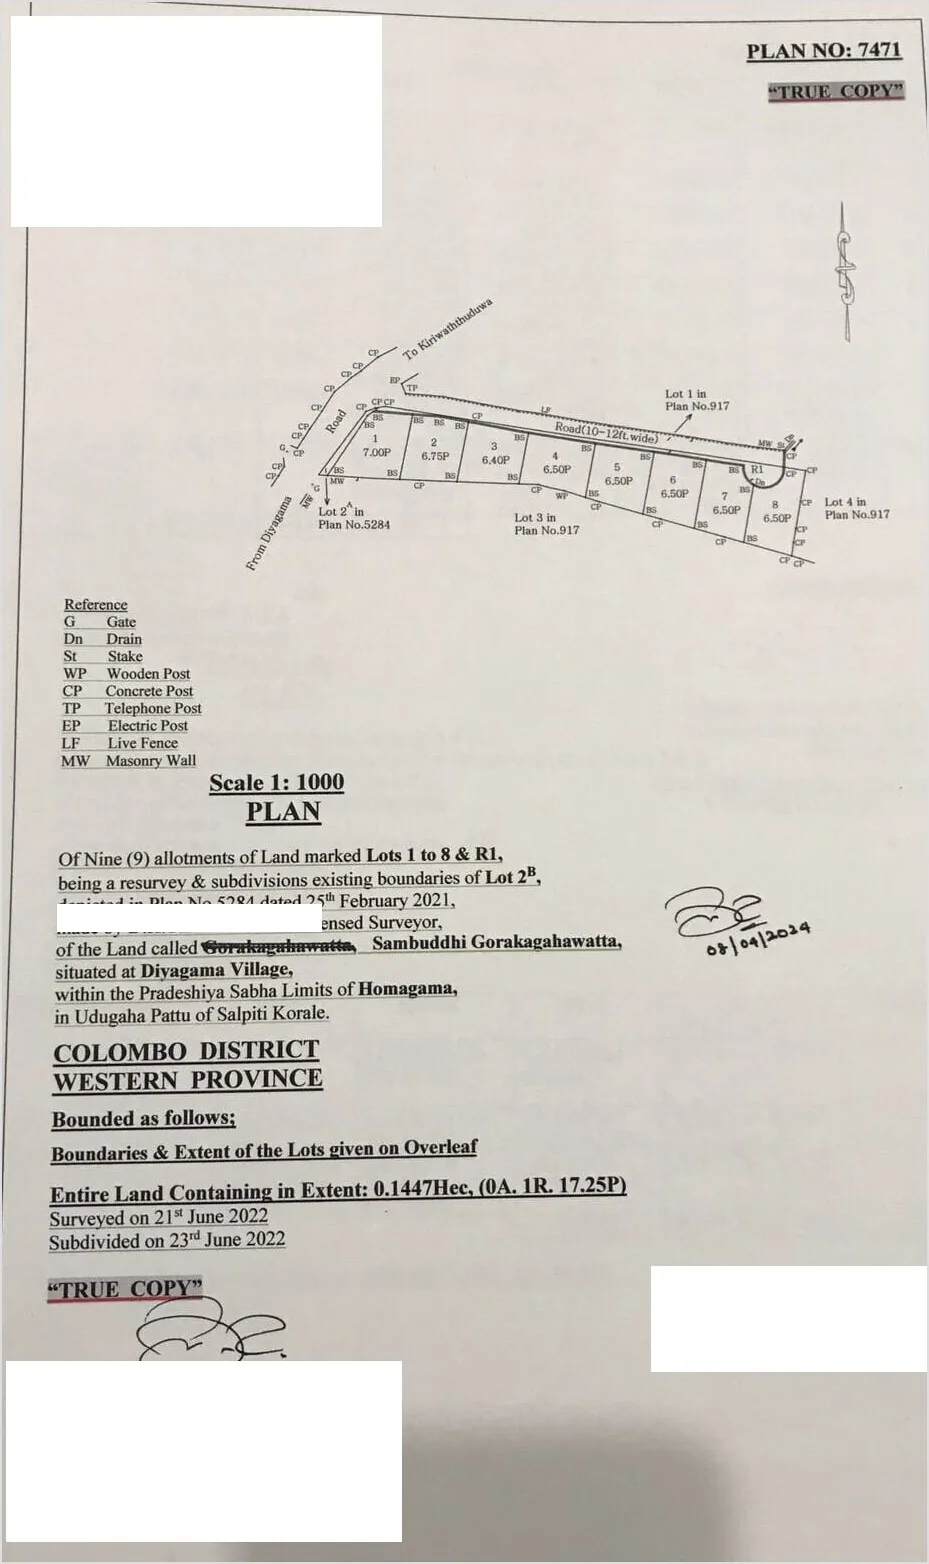
Figure 3. The survey plan. Nine allotments in a single row off a 10 to 12 ft wide internal road, with masonry walls, live fences, concrete posts and boundary stakes recorded along each boundary. Surveyor identity details have been redacted for publication.
Read carefully, this plan is already dictating the design:
Every lot in the row shares boundaries left and right. Two of the three long edges of Lot 8 are party boundaries. Nothing can be lit or ventilated from those sides – not now, and not later when the neighbouring lots are built out.
The access is a 10 to 12 ft wide internal road. That governs the gate position, the turning arc for a car, and where the car park has to sit. On a 10 ft road a car cannot be manoeuvred into an awkwardly placed garage.
The boundary reference legend records masonry walls, live fences, concrete posts and stakes. Live fences and stakes are provisional markers – they grow, are cut back and get moved. On a plot this size, a boundary that is uncertain by even 6 inches is a real quantity of floor area.
The lot is not a rectangle. The row is cut on a slight skew, which is why the ground floor plan shows a non-parallel rear boundary and why the wet kitchen wall runs at an angle to the rest of the plan.
Document 02
The site plan: fitting a house, a car and the drainage onto 6.5 perches
The site plan is where the small-plot problem is actually solved, because four things compete for the same ground: the building footprint, the building line off the road, the car park, and the on-site sewage disposal.
On a large plot these are separate zones. Here they overlap, and the resolution was to confine the whole of the drainage installation to the front-left strip under and beside the car park: a waste water pit, a septic tank and a soakage pit all sit in that band, clear of the building footprint and clear of the structure’s column grid, while remaining accessible for desludging from the road.
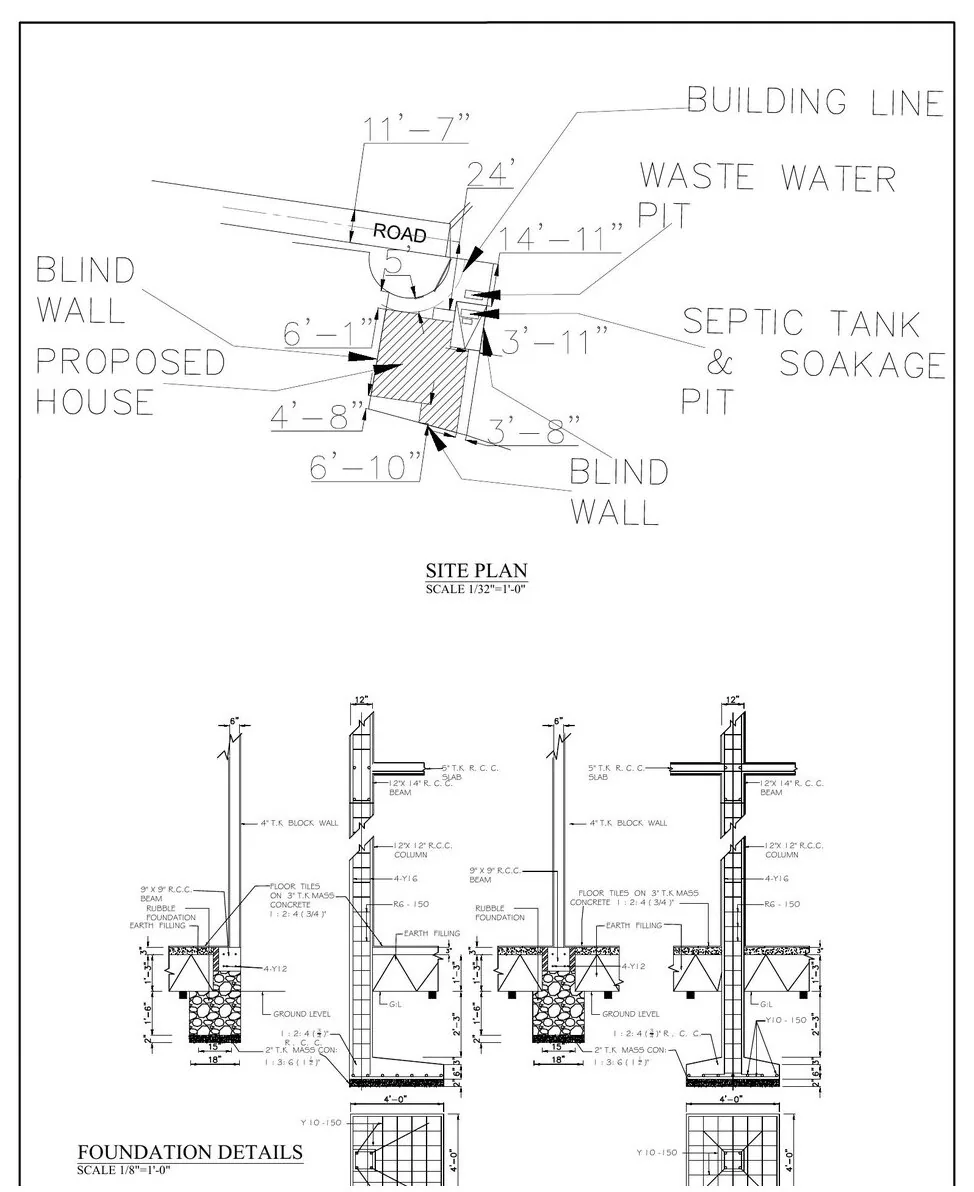
Figure 4. The site plan and foundation details. The site plan sets the building line off the road and the positions of the waste water pit, septic tank and soakage pit. Below it, the foundation sections: random rubble foundation, 12" x 12" RCC columns with 4-Y16 bars, 12" x 14" beams and 4′-0" square footings.
The foundation details on the same sheet are worth reading alongside the site plan. The house is carried on seventeen column footings, each 4′-0" square with a Y10 at 150 mm reinforcement mat, under 12" x 12" RCC columns reinforced with four Y16 bars and R6 links at 150 mm. Random rubble masonry in 1:5 mortar forms the wall foundation, on a 2" mass concrete blinding in 1:3:6. Seventeen columns is a deliberately lean grid for a three-storey house: every additional column would have taken width out of rooms that are already tight.
The design response
Seven moves that make 6.5 perches feel generous
1. Build to the boundary behind blind walls
A conventional setback layout would give up a strip of unusable side yard on each flank. Here the structure goes to the boundaries and those edges become blind walls – solid, window-free, and continued above roof level at 6′-6" where privacy from neighbouring upper floors is needed, dropping to 5′-0" around the pool where it is not. The plans annotate them on all three sides. That single decision recovers several hundred square feet of internal floor area that would otherwise have become dead ground.
2. Put a courtyard in the middle, open through two floors
With the flanks sealed, light and air have to come from inside. A courtyard of 5′-10" by 5′-6" sits at the centre of the ground floor plan, open to the first floor above, where the plans mark it "COURTYARD BELOW". It sits immediately beside the staircase, so the courtyard and the stair well read as one bright volume from the entrance right up to the roof terrace.
This is the quiet engine of the design. It cross-ventilates the deep centre of a plan that can only be lit from two ends, keeps the stair from becoming a dark shaft, and gives the living area an outlook that does not depend on a neighbour’s goodwill or a neighbour’s future building.
3. Stack the wet areas over one service core
The ground floor bathroom, the first floor master bathroom and the second first-floor bathroom are stacked and clustered to one side. The waste water and sewer drawings show what that buys: short vertical stacks, a small number of manholes, and a single sewer run at 1:100 fall to the septic tank. Fewer metres of pipe, fewer chases through beams, and fewer opportunities for a leak in a wall you cannot easily open.
4. Separate the kitchens
The ground floor carries a 12′-6" dry kitchen opening off the dining area and a separate wet kitchen at the rear against the boundary. This is a distinctly Sri Lankan requirement and it is worth protecting even when space is scarce: heavy cooking, grinding and washing stay out of the social space, while the dry kitchen stays presentable to visitors. The rear position also puts the wet kitchen directly beneath the first floor washing area and next to the drainage line.
5. Keep a bedroom on the ground floor
A bedroom of 10′-10" by 11′-0" with an attached bathroom sits on the ground floor. In a three-storey house this is not a luxury. It is what allows the home to work for elderly parents, for a guest, or for the owners themselves in twenty years, without which a house of three levels becomes unusable to anyone who cannot climb. On 6.5 perches it is also the harder choice, because that bedroom competes directly with living space.
6. Take the recreation to the roof
There is no garden on 6.5 perches once you have parked a car. So the plan sends leisure upward. At +22′-0" the roof terrace level carries a mini pool of 12′-6" by 10′-0", paved terraces on several sides, the overhead water tank enclosure, and a stair arriving beneath a cover slab at +32′-6" that shelters the landing and gives the elevation its floating top plane.
7. Solve the car in plan, not on site
A covered car park of 10′-0" by 16′-0" sits at the front left corner at +0′-6", with the verandah and the main entrance beside it. The site plan sets the building line and shows the turning arc off the narrow access road. On a 10 to 12 ft road, a car park that works only in theory is a defect that cannot be fixed after the walls are up.
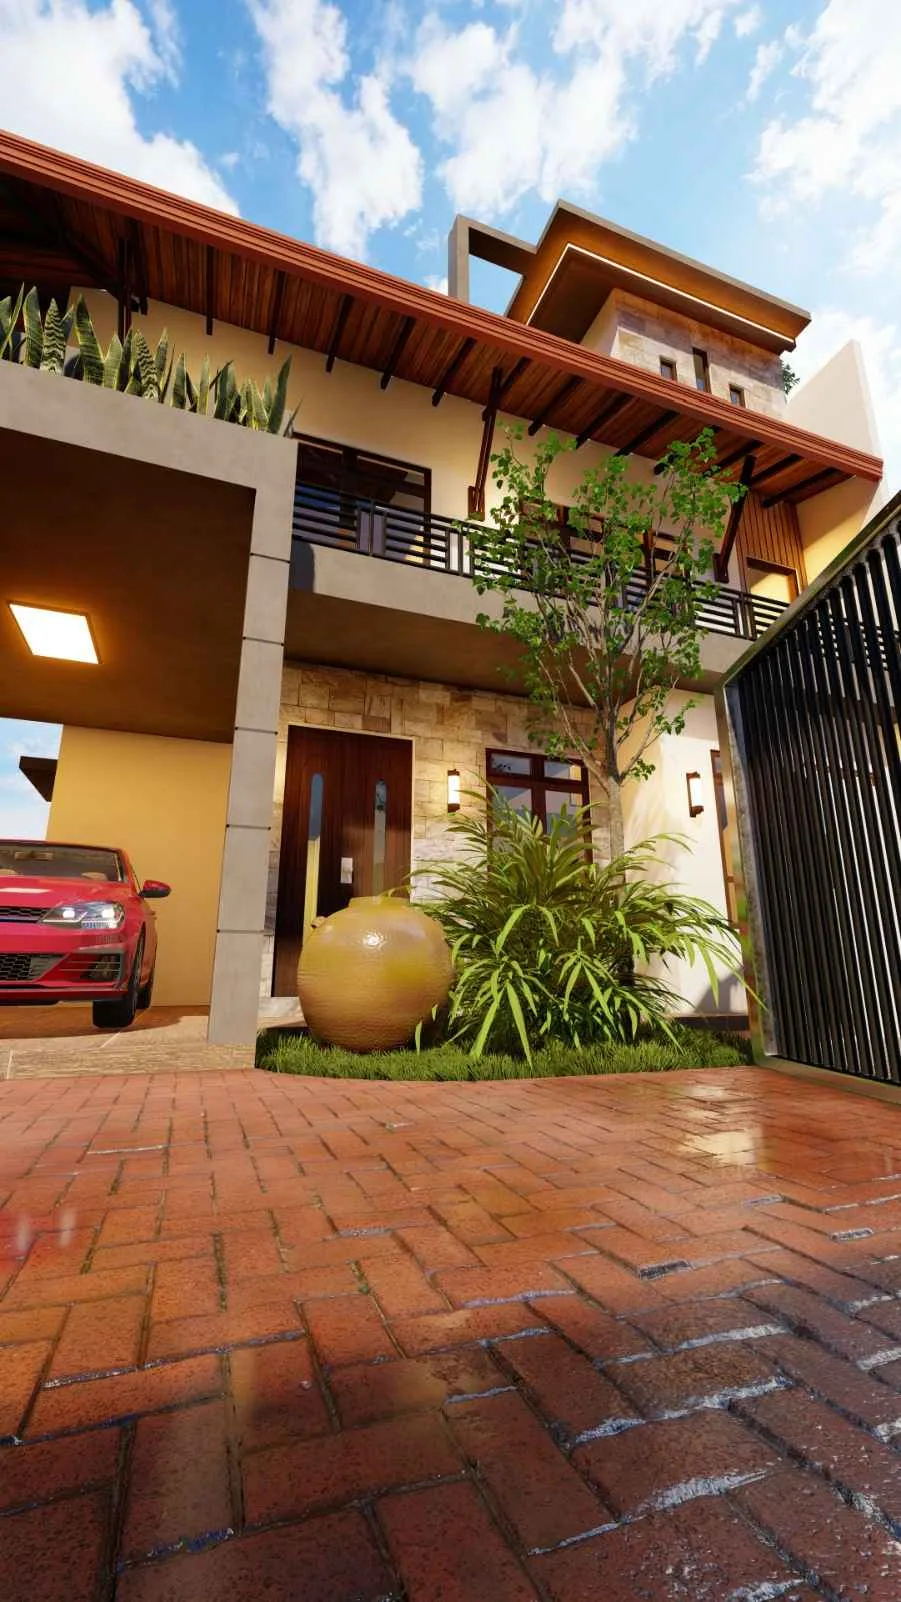
Figure 5. The entrance court. The car park, the paved forecourt and the entrance all share the front strip, with stone cladding used only where it is seen from the road.
The house, level by level
Ground floor – 1,214.25 sq ft at +1′-0"
Car park, verandah, living area, dining area, dry kitchen, wet kitchen, a bedroom with attached bathroom, the internal courtyard, a niche for the Buddha statue, paved pavements to two sides, and the staircase at 10" tread and 6" riser.
The entry sequence runs verandah to living area to dining, with the dry kitchen opening off the dining and the wet kitchen behind it. The staircase is set against the courtyard rather than buried in the plan. A dedicated position for the Buddha statue is planned into the living area rather than found later – a small courtesy that clients consistently notice and that is difficult to add once furniture layouts are fixed.
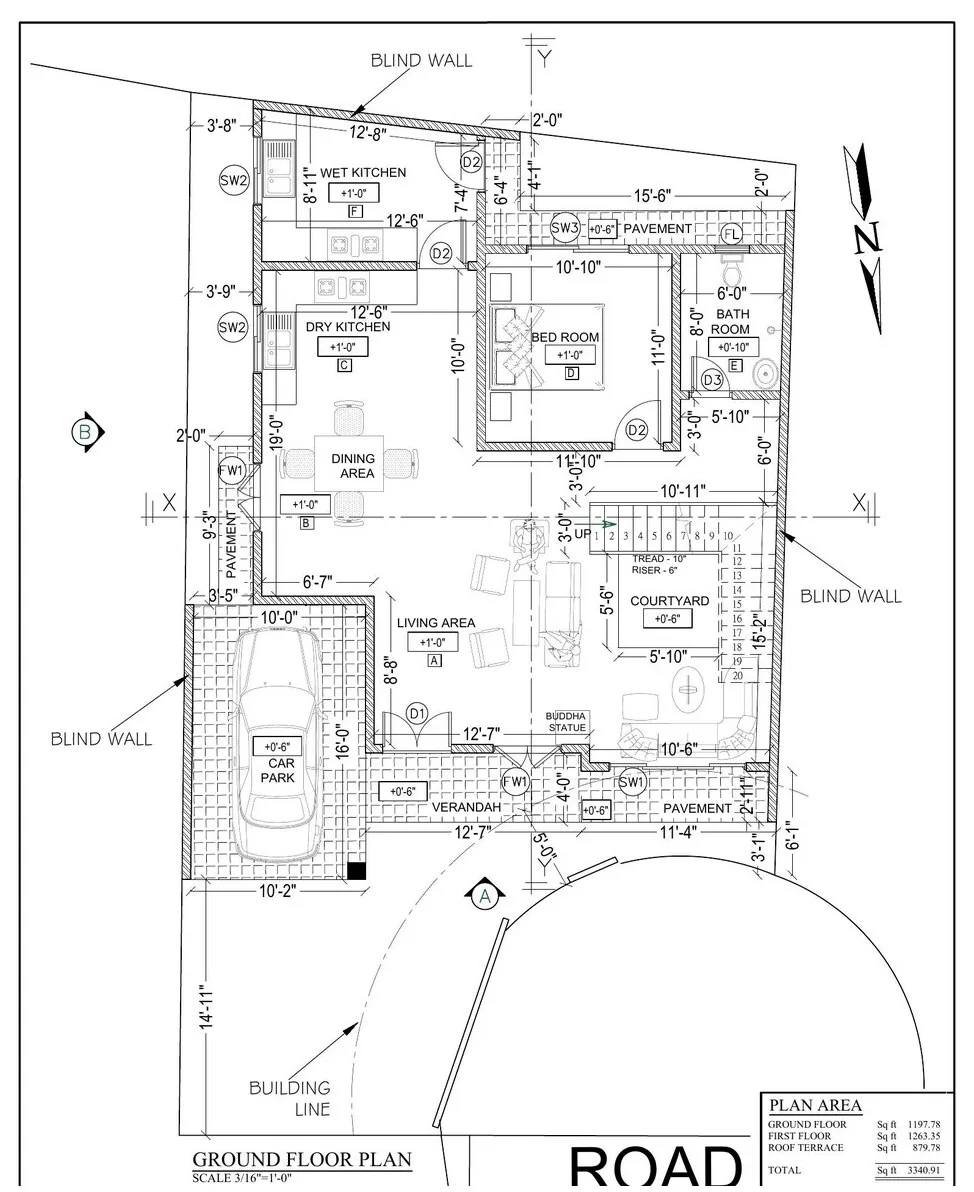
Figure 6. Ground floor plan: car park, verandah, living, dining, dry and wet kitchens, bedroom with attached bathroom, and the courtyard beside the stair. Blind walls are annotated on three sides.
First floor – 1,263.35 sq ft at +11′-6"
The master bedroom with attached bathroom, a second bedroom with attached bathroom, a TV lobby of 13′-6", a lobby, a washing area, two balconies, a flower bed and sun shades.
The first floor is the larger of the two, overhanging at the front to form the balcony line and the 2′-0" sun shades that shield the ground floor openings below. The TV lobby gives the family a second living space independent of the formal ground floor, which matters in a house where the ground floor is fully committed. The washing area sits at the rear with its own balcony and sun shades, keeping laundry off the front elevation entirely.
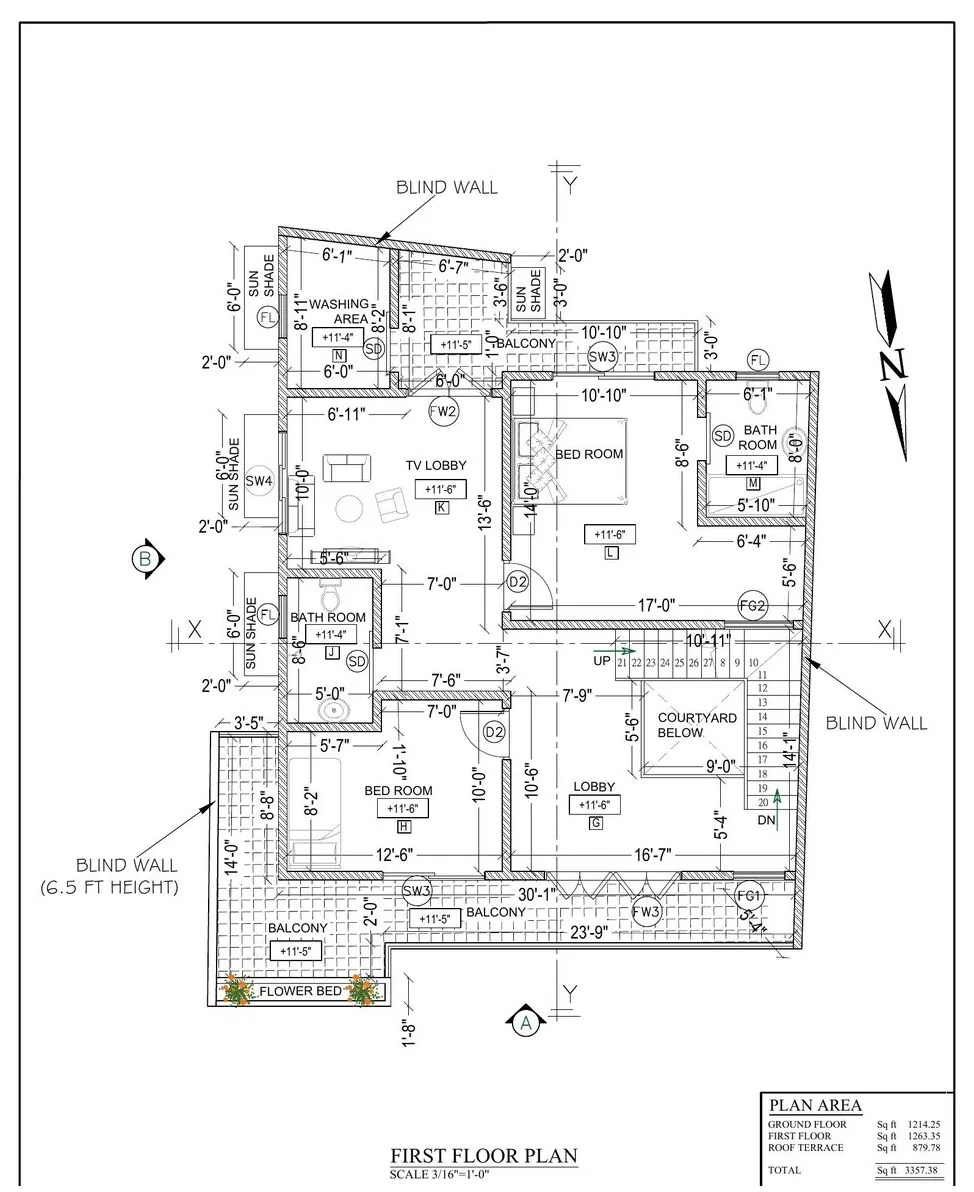
Figure 7. First floor plan: two en-suite bedrooms, TV lobby, lobby, washing area, two balconies and a flower bed, with the courtyard open below and sun shades on the exposed sides.
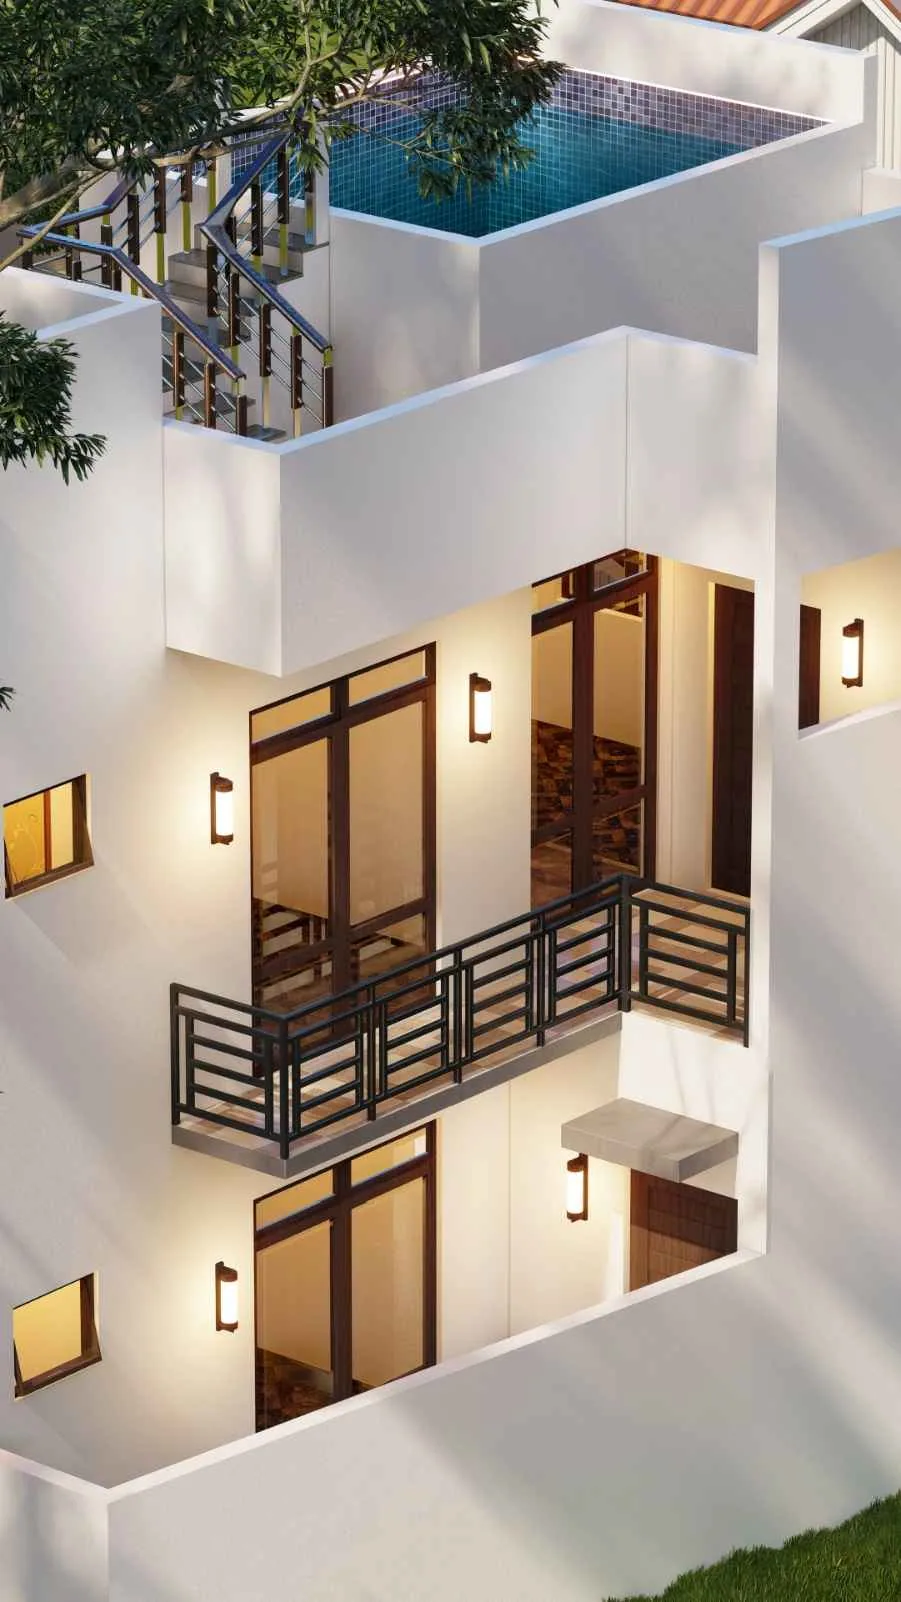
Figure 8. The side and rear. Where the boundary is shared, the wall is blind; where the ground falls away to the neighbouring lot, the balconies and openings appear.
Roof terrace – 879.78 sq ft usable at +22′-0"
A mini pool of 12′-6" by 10′-0", four separate terrace zones, the water tank enclosure, and the stair arriving under the cover slab at +32′-6". Screen walls at 6′-6" and 5′-0" define the whole level.
The screen walls matter as much as the pool does. In a tightly packed subdivision, a rooftop terrace overlooked by three neighbours’ upper floors is a terrace nobody uses. At 6′-6" the walls give privacy where it is needed; at 5′-0" around the pool edge they keep the sight lines open where it is not.
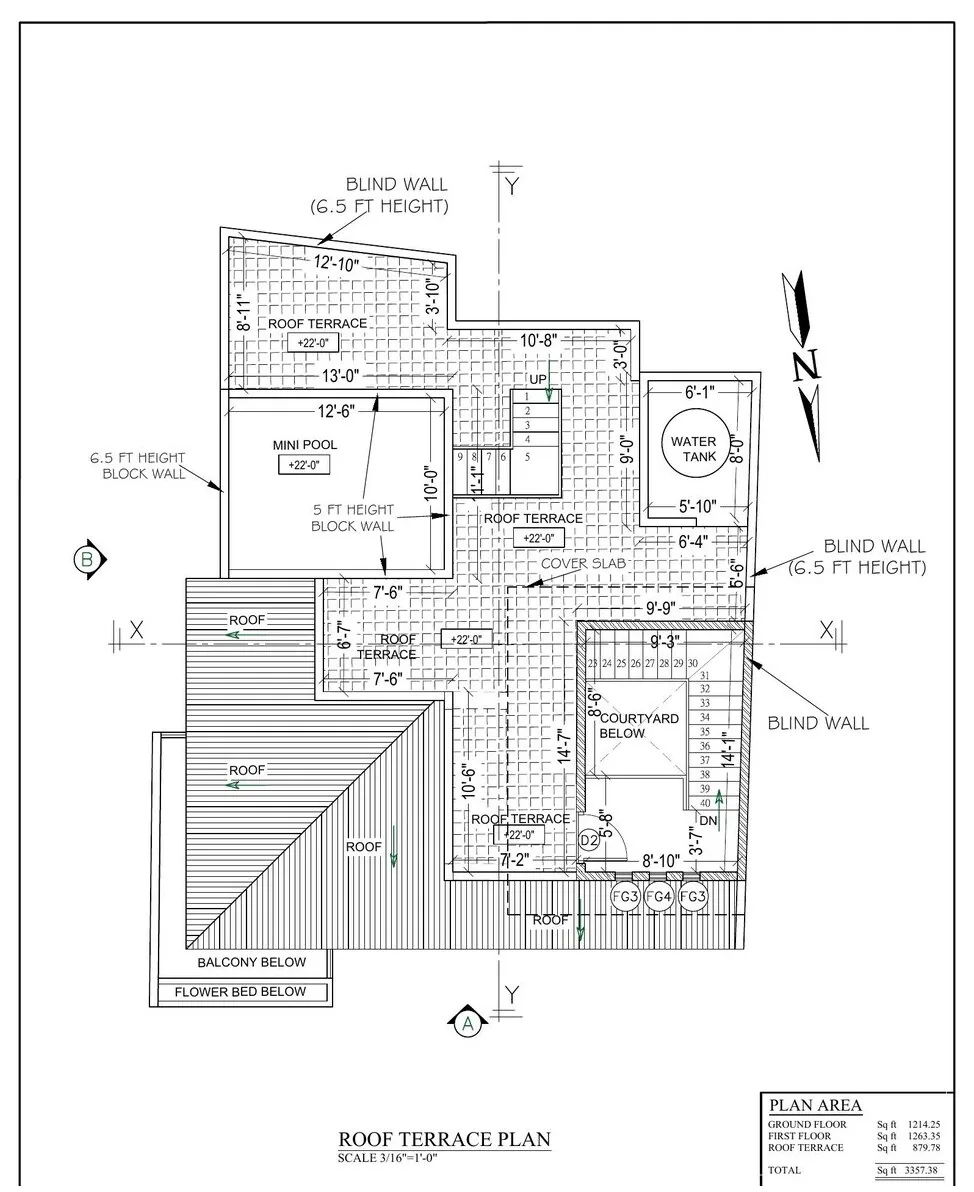
Figure 9. Roof terrace plan: mini pool, four terrace zones, water tank enclosure, cover slab over the stair, and screen walls at 6′-6" and 5′-0".
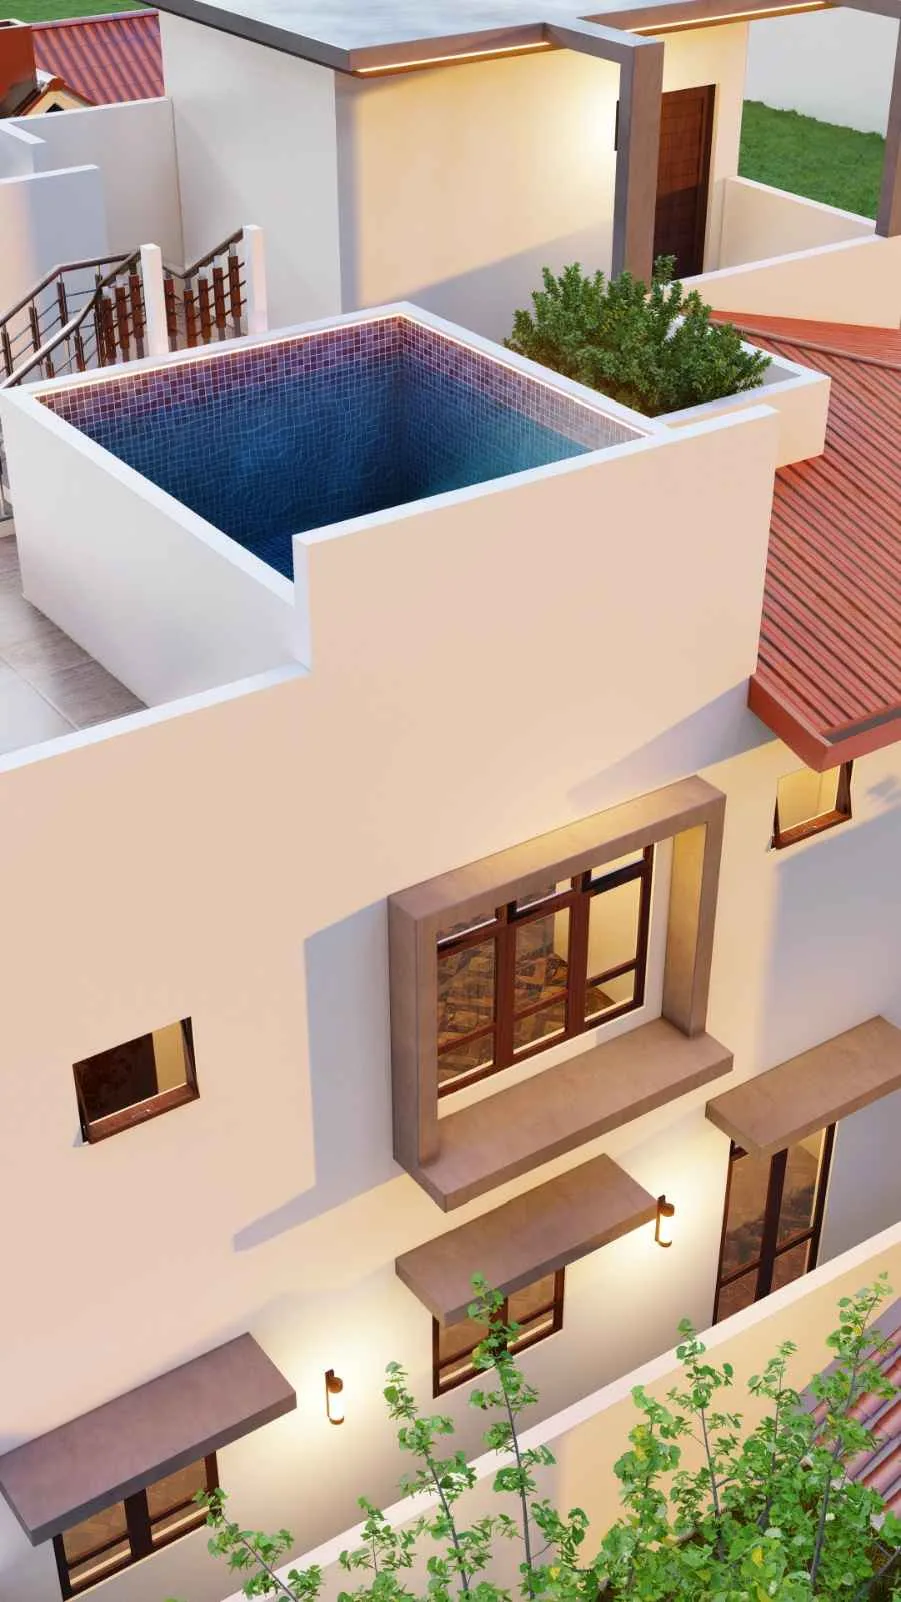
Figure 10. The rooftop mini pool. On a plot with no garden, this is the only outdoor room the house has – which is precisely why it was worth the structural and waterproofing effort.
A rooftop pool is not only an amenity decision. It is a structural and drainage decision that must be taken at the start rather than added later: the water load on the slab and beams, the waterproofing specification, and above all the overflow and backwash discharge route all belong in the structural and plumbing drawings. On this project the BOQ carries waterproofing to the pool at 50 m², the terrace at 120 m² and the bathroom areas at 30 m², all in a cementitious system applied to the manufacturer’s specification.
Structure
Sized for three storeys on a small footprint
| Element | Specification |
|---|---|
| Foundation | Random rubble masonry in 1:5 cement mortar on 2" thick 1:3:6 mass concrete blinding |
| Column footings | 4′-0" x 4′-0", Y10 at 150 mm mat, 17 nos |
| Columns | 12" x 12" RCC, 4-Y16 main bars, R6 links at 150 mm |
| Beams | 12" x 14" RCC slab beams; 9" x 9" RCC tie beams at plinth level |
| Slabs | 5" and 6" thick RCC with Y10 at 150 mm |
| Concrete grades | Grade 25 to columns, beams and slabs; Grade 20 to floor slab and lintels; Grade 10 blinding |
| Reinforcement | Tor steel 460 N/mm², mild steel 250 N/mm² |
| Walls | 4" block walls internally and externally, 20 mm plaster in 1:3 both faces |
| Lintels | 6" x 6" Grade 20, 2 nos 10 mm tor bars, 6 mm stirrups at 6" centres |
| Roof | 2" x 4" Class 1 timber rafters, 2" x 2" battens, 3" x 4" wall plate, asbestos sheeting at 15°, G.I. gutter and valance board |
| Floor protection | Anti-termite treatment and 1000 gauge polythene damp proof membrane under the ground floor slab |
| Staircase | 1:2:4 concrete, Y12 at 150 mm centres, 3′ waist, 10" tread and 6" riser |
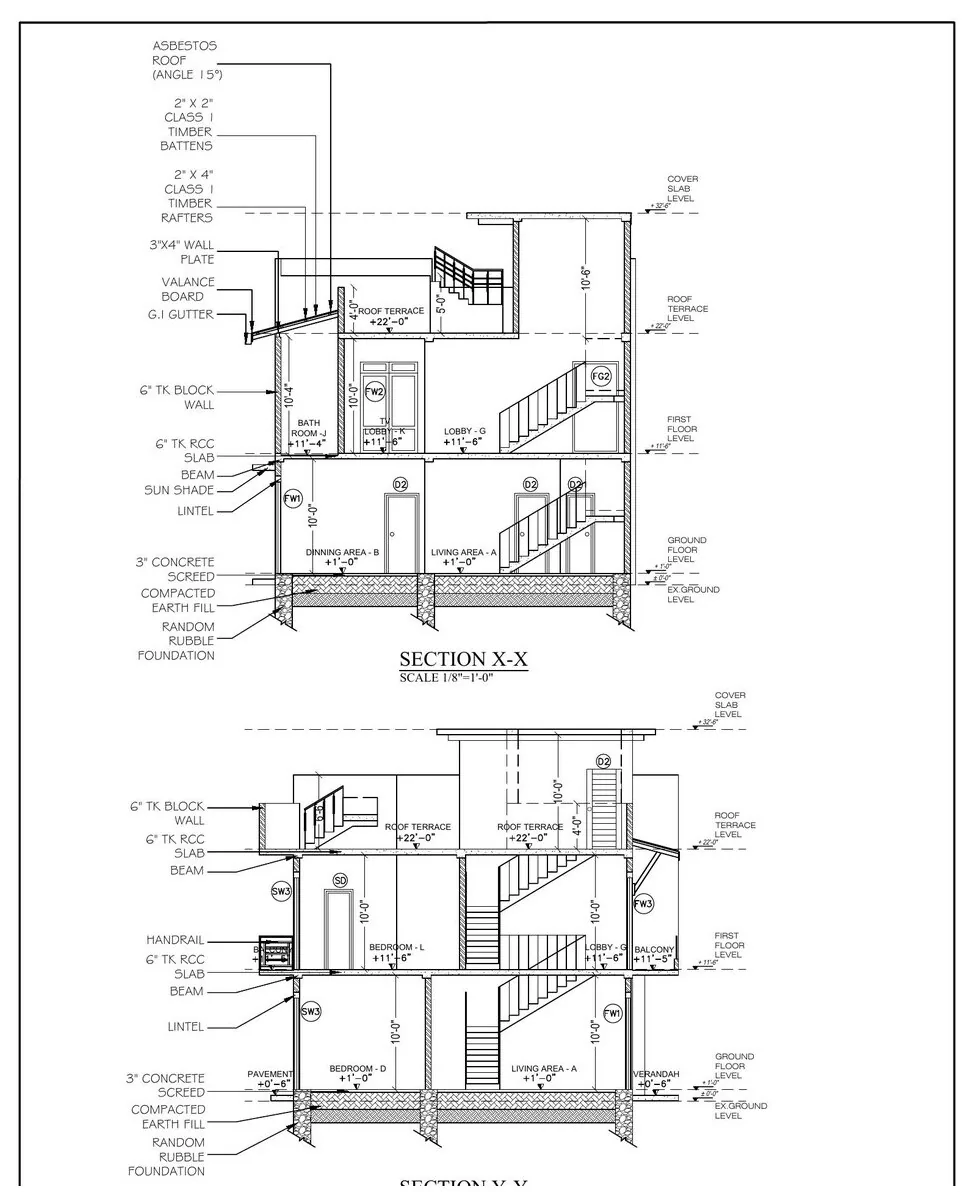
Figure 11. Sections X-X and Y-Y. The sections show the 10′-0" clear floor to ceiling heights on both occupied levels, the sun shades and lintels, the random rubble foundation on compacted earth fill, and the 3" concrete screed.
The sections record one decision that a plan cannot show: 10′-0" clear heights on both occupied floors. On a narrow plan, ceiling height is the cheapest available substitute for floor width. A 10′-10" wide bedroom with a 10′-0" ceiling reads as a generous room; the same room at 8′-6" reads as a corridor. The additional cost is a small quantity of column shaft, block wall and plaster – measured in the BOQ at 5.18 m³ and 4.32 m³ of column concrete for the two lifts respectively – and it is the single best value decision in the whole design.
Services
The electrical and plumbing drawings we produced in-house
Small-plot houses fail on services far more often than they fail on architecture. A 3,357 sq ft house squeezed onto 6.5 perches has no spare wall thickness in which to hide a mistake and no external side yard down which to run a forgotten pipe. All four service layers were therefore drawn and coordinated against the architecture before construction, on ten sheets.
Electrical layouts – ground floor, first floor and roof terrace
Every point is drawn and dimensioned by mounting height above finished floor level, using a five-band convention: H = 12", 24", 45", 60" and 96". Distribution boards, ceiling lights, chandelier points, wall brackets, LED strip coves, ceiling and wall fans with regulators, 13A and 15A sockets, television points, air conditioner points, spot lights, hanging lights, and one, two, three and four gang switching plus two-way and dipole switches are all located on plan.
The BOQ carries approximately 180 wiring points, three distribution boards with incoming MCBs, RCCBs and outgoing MCBs, 80 LED fittings, 40 wall brackets and 7 fans, together with a provisional sum for the main CEB connection.
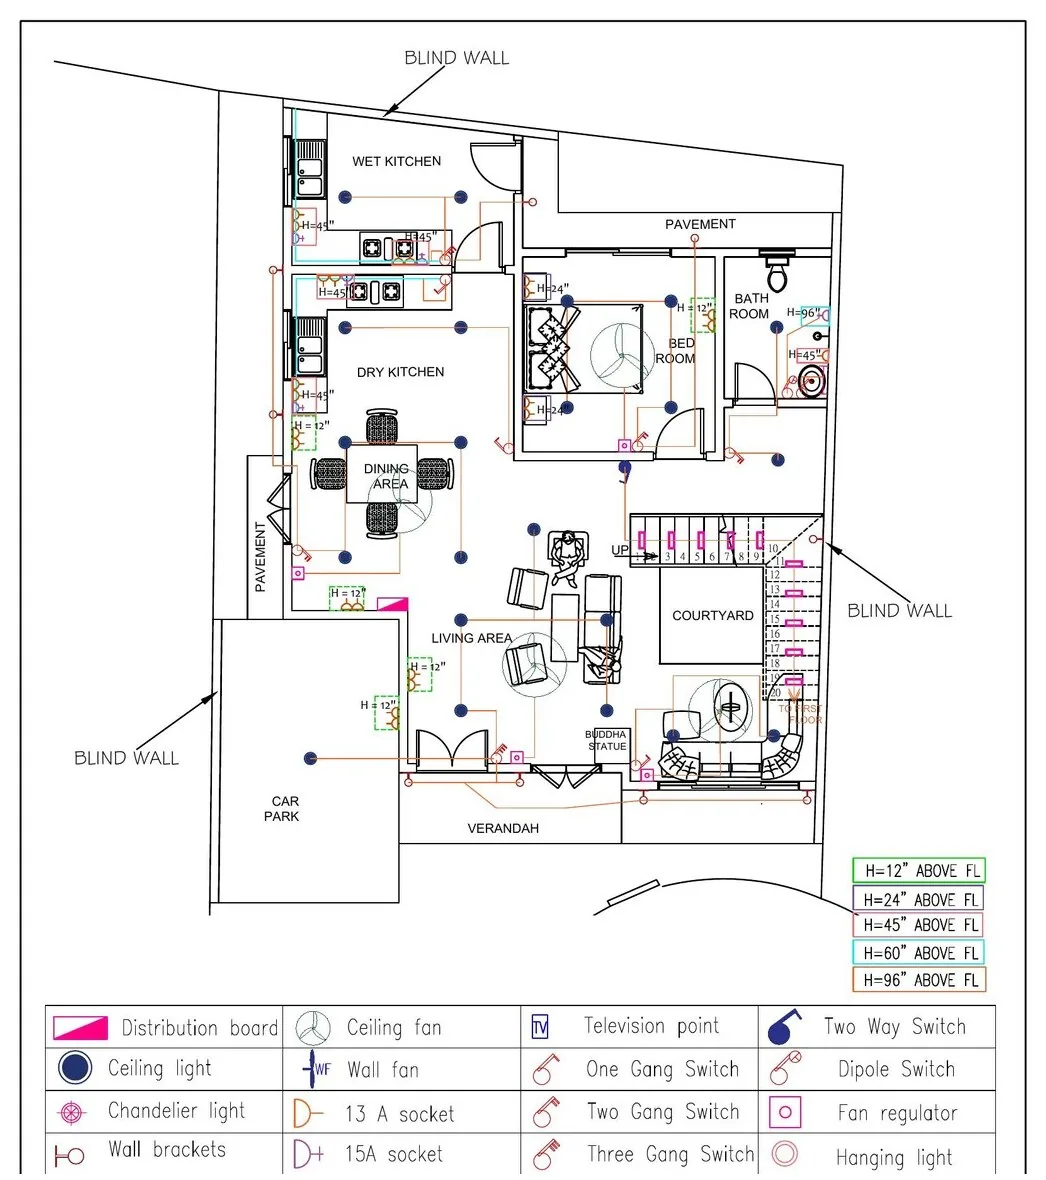
Figure 12. Electrical layout, ground floor. Every point is colour-coded by mounting height, with the full legend of symbols on the sheet – so switch heights are fixed before plastering rather than argued about after.
Water supply layouts – three levels
Cold and hot water are drawn separately, with the water meter position, gate valves, geysers at each bathroom, bidet showers, the pressure pump, and clearly annotated FOHT and TOHT risers – from and to the overhead tank – so that at every floor crossing the plumber knows which pipe is doing what. Three 1,000 litre tanks are scheduled, with the cold water distribution in UPVC Type 1000.
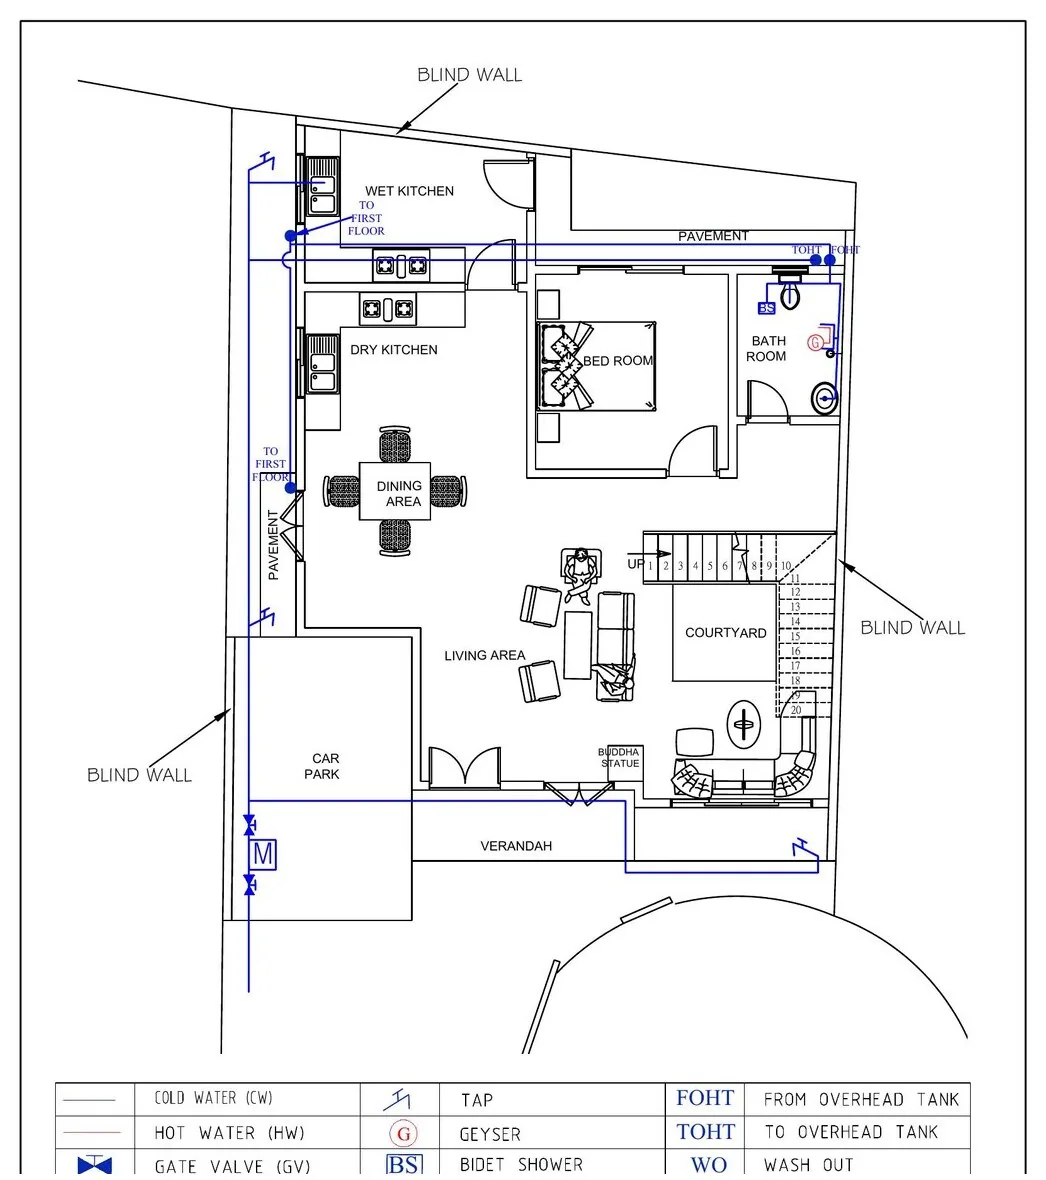
Figure 13. Water supply layout, ground floor. Cold water, hot water, the meter, gate valves, the geyser and the risers to and from the overhead tank on the roof.
Waste water and sewer layouts
Waste water runs in 100 mm diameter UPVC 1000 cage pipe at 1:100 fall, through waste water down pipes, kitchen sink connections, trapped floor gullies and waste water manholes, to a waste water pit of 8′-0" by 4′-0" and 4′-0" deep with a 3" RCC cover. Foul drainage runs separately in the same pipe size and fall through sewer down pipes and sewer manholes to a septic tank sized 2390 x 3140 x 1500 mm – 11,255 litres – with a soakage pit of 2390 x 1500 x 1500 mm, or 5,375 litres.
Separating grey water from foul drainage on a plot this small is not a refinement; it is what keeps the soakage pit within a size the plot can accommodate.
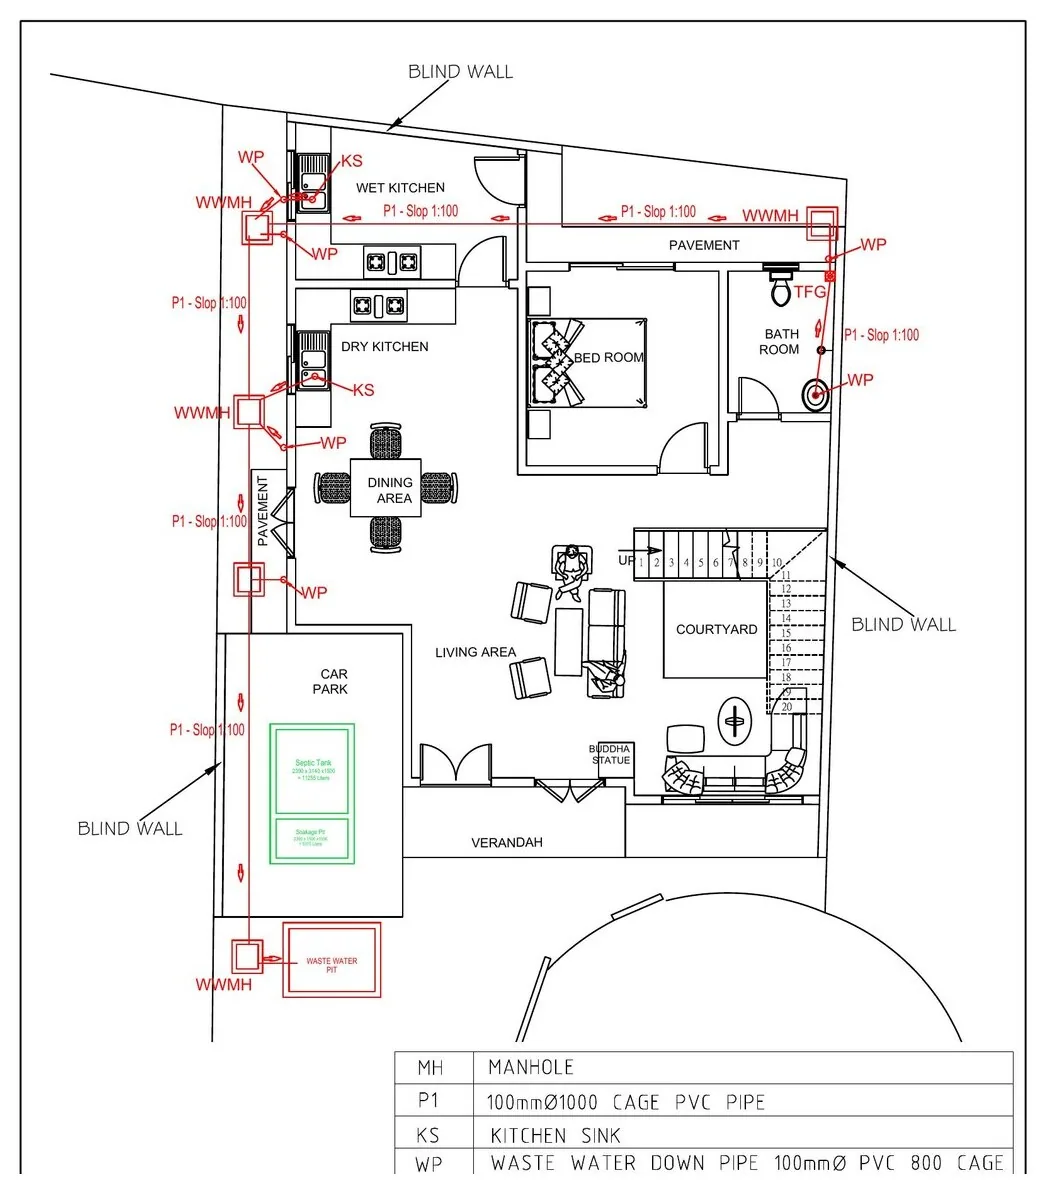
Figure 14. Waste water layout, ground floor. Manholes, 1:100 falls and down pipe positions, with the septic tank, soakage pit and waste water pit confined to the front strip beside the car park.
Because these drawings exist, the mason knows where to leave sleeves, the electrician knows the switch heights before the walls are plastered, and nobody has to break a beam on site to chase a pipe that was never planned. On a tight plot that coordination is not a nice-to-have; it is the difference between a finished house and a house full of surface conduit.
Openings and materials
Repetition where it saves money, generosity where it shows
The door and window schedule is deliberately compact, because repetition is cheaper than variety – in joinery, in lintels and in formwork.
| Type | Size (W x H) | Description | Total |
|---|---|---|---|
| D1 | 4′-0" x 8′-0" | Timber framed single sash solid timber entrance door | 01 |
| D2 | 3′-0" x 7′-0" | Timber framed solid timber door | 06 |
| D3 | 2′-6" x 7′-0" | Timber framed solid timber door | 01 |
| SD | 2′-6" x 7′-0" | Timber framed solid sliding door | 03 |
| FW1-FW3 | 4′-0" to 8′-0" wide x 8′-0" | Timber framed glazed french windows, 2 and 4 sash | 04 |
| SW1-SW4 | 4′-0" to 8′-0" wide | Timber framed glazed sliding windows, 2, 3 and 4 sash | 07 |
| FG1-FG4 | Various | Timber framed fixed glass | 05 |
| FL | 2′-6" x 2′-0" | Timber framed top hung glazed fanlight | 04 |
Full-height 8′-0" openings on the front elevation do the heavy lifting, pulling light deep into a plan that can only be lit from two ends. The four top-hung fanlights ventilate bathrooms and service areas where a full window would cost privacy.
The material palette then keeps cost down while reading as expensive: white render across most of the mass, stone cladding on selected feature panels only, timber-framed joinery, black steel railings, an LED cove under the top slab, and paving blocks at the entrance court. Stone appears only where it is seen from the road. That is a budget decision disguised as a design decision, and it is the most reliable one available.
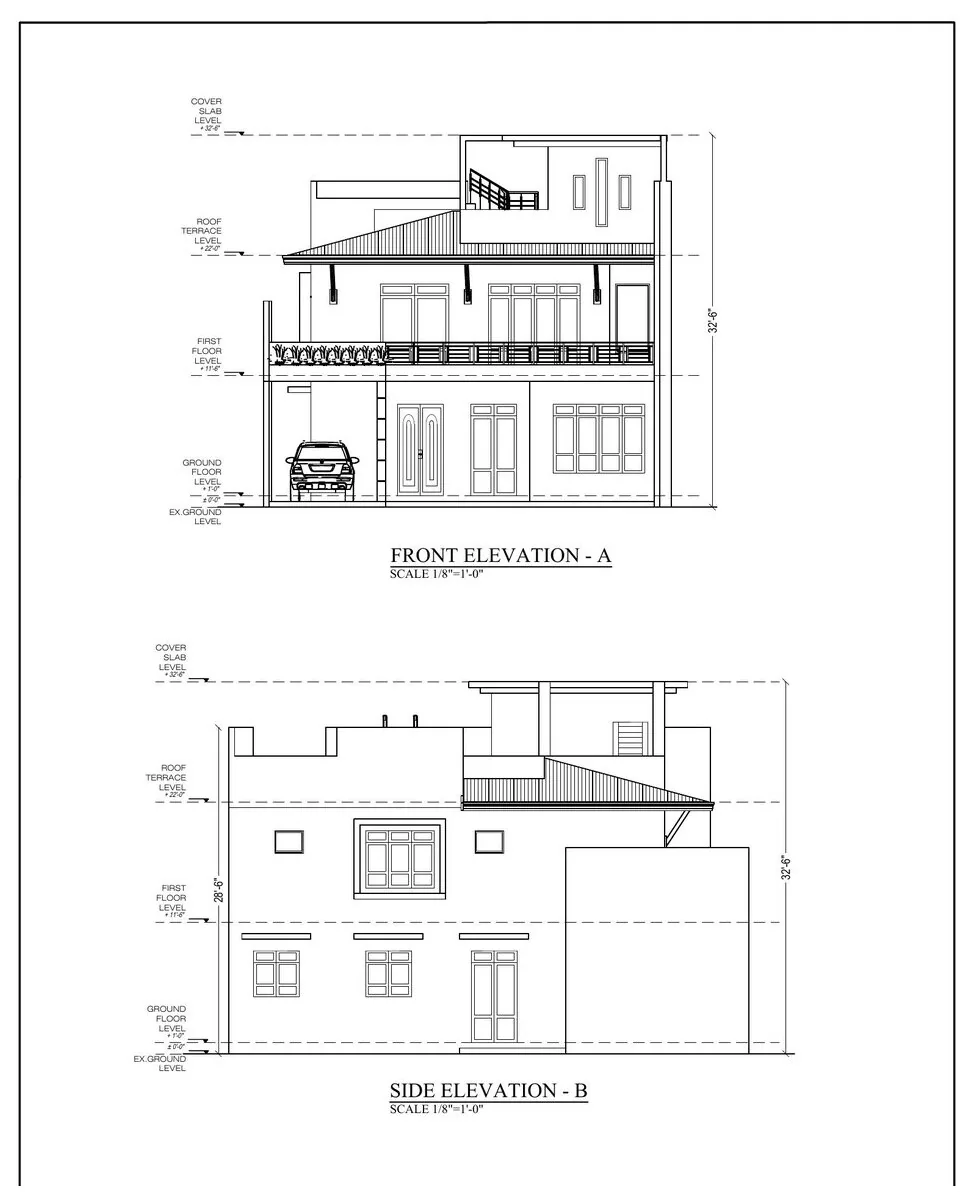
Figure 15. Front and side elevations. The 32′-6" total height is composed as three horizontal bands – a heavy base at the car park, a glazed and balconied middle, and a lighter top storey set back behind the pitched roof line.
Cost
How a three-storey house stayed inside a limited budget
This is the question that every 6 perch client actually asks, and on this project the answer is not one decision but eight, all of them visible in the priced Bill of Quantities.
High-variance items were placed in client supply. Tiles and adhesives, doors and windows, bath fittings, light fittings, the pantry, the boundary wall and gate, the roof and the pool were scoped as client-supplied against labour-only rates from us, and priced in the BOQ as a separate estimated block. The client buys at their own pace, chooses their own quality tier, and captures the saving directly instead of paying a contractor margin on materials.
All tiling and finishes were priced labour-only. Wall tiling, floor tiling, skirting and staircase tiling appear in the BOQ as labour rates per bathroom and per floor, not as supply-and-fix.
Asbestos sheet on timber, not clay tile on steel. The same 15° profile and the same silhouette as the renders, at a fraction of the cost – and the pitched roof covers the front block only, because the rest of the roof is occupied terrace earning its keep.
Paving blocks at ground floor instead of imported tile. 120 m² of paving to the entrance, verandah and car park zone at labour-only rates.
A lean seventeen-column grid. Fewer footings, less excavation, less formwork and less steel: the BOQ records 1,517.76 kg of footing reinforcement in total for the whole house.
Four inch block walls throughout. 800 m² of walling at 4" rather than 6" saves masonry and plaster on both faces, and quietly recovers real internal floor area on a plot where inches are money.
Repetitive formwork. Identical 12" x 14" beams and identical column shafts mean plywood shutters are reused floor to floor rather than cut fresh, which is why formwork is priced per square metre at a consistent rate across both floors.
One staircase and one service core. No second stair, no split plumbing zones, no duplicated risers, and no pump or tank duplication.
Construction cost is always site-specific and rate-sensitive. Per-square-foot figures are useful for orientation and misleading as quotations, because they depend on ground conditions, the finish standard the client chooses, and the market at the moment of tender.
Before you design
Small-plot pre-design checklist
This is the list we work through on 6 to 10 perch subdivision lots in the Homagama, Kottawa and Athurugiriya belt. Much of it does not appear on a large-plot checklist at all.
Survey plan from a Registered Licensed Surveyor, with the exact extent in perches and the subdivision lot number.
Confirmation of how many boundaries are shared, and what physically marks each one – wall, live fence, post or stake.
Width of the access road at the point of entry, and confirmation that a car can turn into the intended car park position.
Street line or building line certificate for the frontage, in date at the time of submission.
Confirmation of the approving authority and the applicable setback, coverage and height limits – here, the Pradeshiya Sabha limits of Homagama.
Agreement in principle from the neighbours, or at minimum an understanding of your rights, before designing a blind wall on a shared boundary.
A decision on the number of storeys taken at the start, because it changes the foundation and column design, not just the drawings.
Position of the on-site sewage disposal fixed early. On 6 perches this is a planning constraint, not a plumbing detail, and separation distances from wells still apply.
NWSDB mains availability and pressure, and CEB supply point and pole position relative to your gate.
A clear split of what the contractor supplies and what the client supplies, priced both ways, before construction starts.
Structural drawings and the structural engineer’s certificate. Three storeys on a small footprint concentrates load; this is not optional.
Construction access assessed. If a concrete truck cannot reach the plot on a 10 ft road, you are pumping, and that changes the price.
Answers
Frequently asked questions
How many square feet can you build on a 6 perch land in Sri Lanka?
One perch is 272.25 sq ft, so 6 perches is 1,633.5 sq ft of land and 6.5 perches is 1,769.63 sq ft. After setbacks and a car park, a realistic ground floor footprint is 1,000 to 1,250 sq ft. Built over three levels that yields roughly 3,000 to 3,400 sq ft of total floor area. This project achieves 3,357.38 sq ft of plan area on 6.5 perches, with a ground floor of 1,214.25 sq ft.
Can you fit three bedrooms and three bathrooms on a 6 perch land?
Yes. In this Homagama design one bedroom with an attached bathroom sits on the ground floor and two bedrooms with attached bathrooms on the first floor, together with a living area, dining area, dry kitchen, wet kitchen, TV lobby, internal courtyard, two balconies and a covered car park.
Is a rooftop pool possible on a small plot in Homagama?
Yes, provided it is designed with the structure from the outset. This 6.5 perch house carries a mini pool of 12′-6" by 10′-0" at roof terrace level, with waterproofing specified to the pool, terrace and bathroom areas, privacy screen walls at 5′-0" and 6′-6", and slabs and beams sized for the water load. Retro-fitting a pool onto a completed roof slab is a different and much more expensive problem.
How do you get natural light into a house with neighbours on both sides?
Use an internal courtyard open through two floors, full height 8′-0" openings on the elevations that are available, top hung fanlights to bathrooms and service areas, and an open stair well beside the courtyard. On this Diyagama lot three sides are blind walls, so all light and ventilation is drawn from the front, the rear and the central courtyard.
Does Structa Engineering provide electrical and plumbing drawings as well as architectural plans?
Yes, and on a small plot they matter more than on a large one. This project included three electrical layout sheets with mounting heights for every point, three water supply layouts covering cold water, hot water, geysers and the overhead tank system, and waste water and sewer layouts with manholes, 1:100 falls and septic tank and soakage pit sizing.
Do you provide a Bill of Quantities with the drawings?
Yes. The BOQ for this project is broken into ground improvement, substructure, superstructure by floor, water supply and drainage, electrical installation and waterproofing, with a separate schedule of client-supplied items so the owner can see exactly which costs they control.
What is the cheapest way to reduce house construction cost without ruining the design?
Control the finishes, not the structure. Move tiles, joinery, sanitary ware, light fittings and the pantry into client supply against labour-only rates; repeat beam and column sizes so formwork can be reused; keep a single staircase and a single plumbing core with stacked wet areas; and spend the material budget only where it is visible from the street. Cutting ceiling heights, wall thicknesses or reinforcement saves less and costs more later.
Should I build three storeys or two on a 6 perch plot?
It depends on the accommodation you need and on the height and coverage the authority permits. The economic argument for the third level on a small plot is strong, because the land, the foundation and the roof are already paid for and the marginal cost of an additional floor is walls, slab and finishes only. The counter-argument is stairs: without a ground floor bedroom, a three-storey house on a small footprint ages badly.
Which areas around Homagama do you design for?
Homagama, Diyagama, Kottawa, Athurugiriya, Hokandara, Padukka, Meegoda, Godagama, Pitipana, Kesbewa, Maharagama and the wider Colombo District. The studio is in Colombo and small-plot projects across the district are handled from there, beginning with a site visit.
How long does a design like this take?
The variable is not drawing speed but how many iterations it takes to reconcile the footprint, the car, the drainage and the boundaries. On a 6 perch plot the plan is effectively a puzzle with one solution, and finding it takes longer than drawing a comparable house on 15 perches.
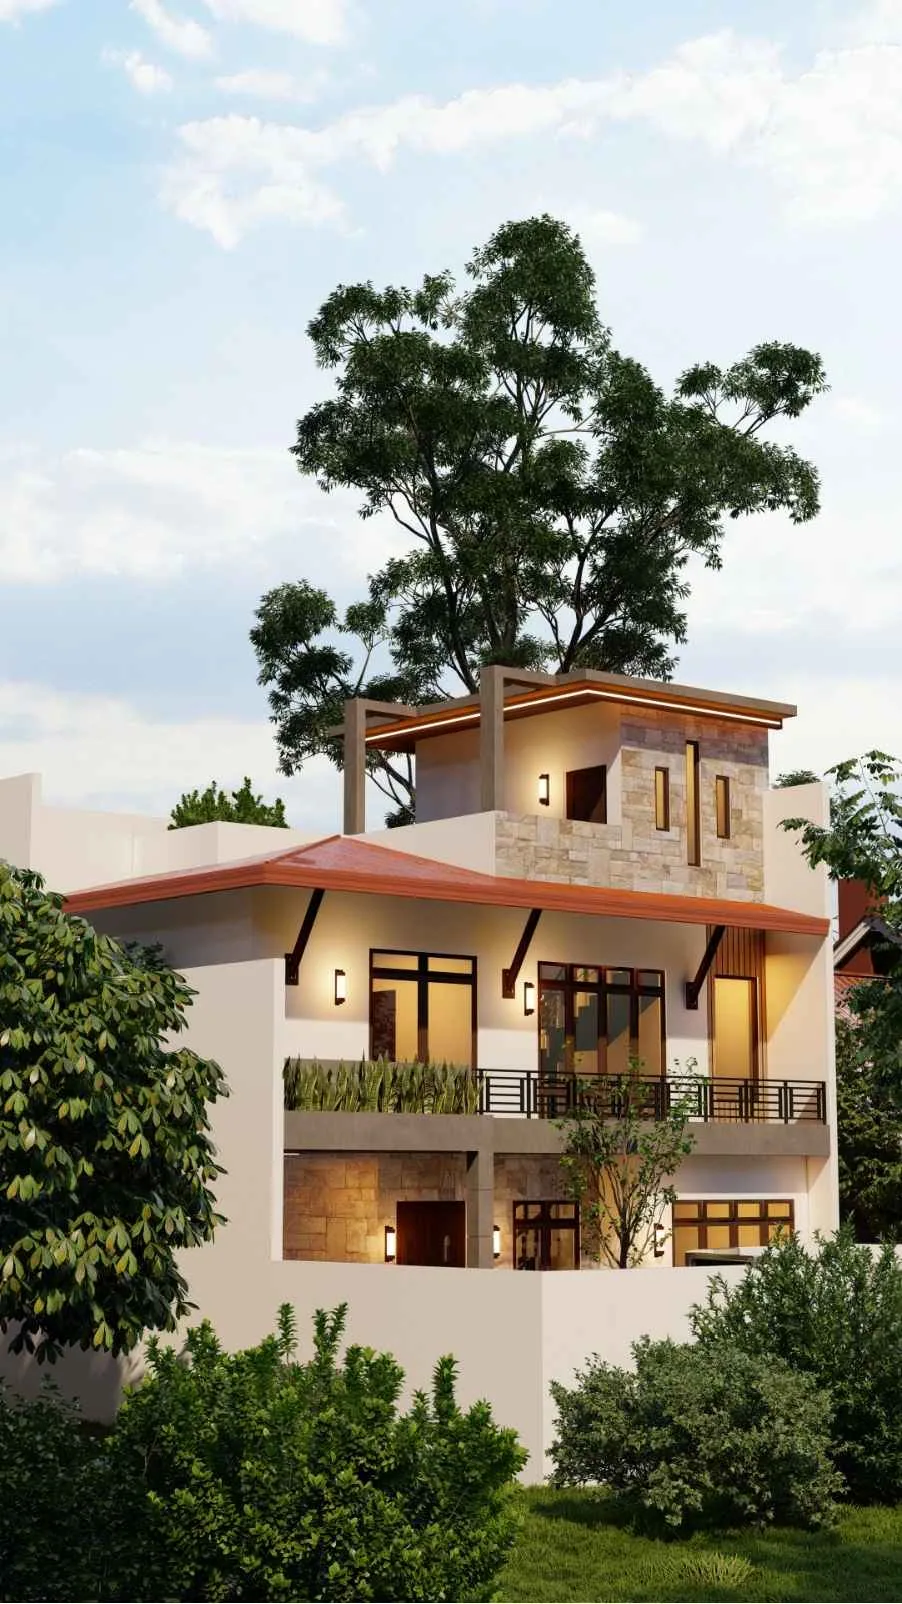
Figure 16. The completed design in daylight. Three levels, a rooftop terrace and a pool, within the footprint of a 6.5 perch subdivision lot.
Sources and disclaimer
Sources, creation date and disclaimer
This guide was prepared on 11 August 2026 from project documents held by Structa Engineering and Contractors (Pvt) Ltd:
Architectural drawing set SEC-1634, revision 01, dated 10 July 2026, comprising ground floor, first floor, roof terrace and cover slab plans, two elevations, two sections, door and window schedule, site plan with foundation details, typical details and architectural visualisations, recording a total plan area of 3,357.38 sq ft on a site of 1,769.63 sq ft.
Electrical and plumbing drawing set SEC-1634, revision 01, dated 6 and 10 July 2026, comprising three electrical layouts, three water supply layouts, two waste water layouts and two sewer layouts.
Bill of Quantities and estimate for the same project, revision 02, dated 18 September 2025, covering ground improvement, substructure, superstructure to both floors, water supply and drainage, electrical installation and waterproofing, with a separate schedule of client-supplied items.
Survey plan, Plan No. 7471, a resurvey and subdivision of Lot 2B in Plan No. 5284 dated 25 February 2021, of the land called Sambuddhi Gorakagahawatta situated at Diyagama Village within the Pradeshiya Sabha limits of Homagama, Udugaha Pattu of Salpiti Korale, Colombo District, Western Province; surveyed 21 June 2022 and subdivided 23 June 2022; entire land extent 0.1447 hectares (0A. 1R. 17.25P).
Owner, surveyor and consultant names and contact details have been removed from published figures. Quantities and rates quoted are read from the project Bill of Quantities and are specific to this project at the date of that document.
Approval requirements, setback and coverage rules, and fee schedules differ between authorities and change over time. Foundation design, structural design, waterproofing and drainage design are project-specific engineering matters that must be resolved for your own land by appropriately qualified professionals. This guide is general information based on one documented project. It is not advice on your land, and it is not a quotation.
Next step
If you are looking at a 6, 7 or 10 perch lot in Homagama, Diyagama, Kottawa, Athurugiriya, Hokandara, Padukka, Meegoda or anywhere in the Colombo District, the first useful conversation is about your land rather than your house. Send us the survey plan and we will tell you what the plot will hold, where the car and the drainage have to go, and what it will cost to document properly.
House Design Sri Lanka – Structa Engineering and Contractors (Pvt) Ltd
Level 26 & 34, East Tower, World Trade Center, Colombo 01 · Tel: 0776575699 · housedesign.lk
ISO 9001:2015 certified · Over 1,000 completed building designs across Sri Lanka
Useful next pages: explore Structa house designs; compare design packages; read how much it costs to build a house in Sri Lanka in 2026; understand building approval in Sri Lanka; see our MEP and structural engineering services; or contact the studio for a site visit.
6-perch Homagama house design FAQ
Can a comfortable house be designed on 6 perches in Homagama?
Yes, but the plan must be site-specific. A compact Homagama or Diyagama house should coordinate setbacks, parking, vertical circulation, ventilation, light, privacy, structure, approvals and services from the first layout.
What matters most in a 6-perch house design?
The biggest priorities are efficient circulation, stacked wet areas, well-placed stairs, daylight, cross ventilation, parking, storage, privacy from neighbours and a buildable structural grid.
Is a 6.5-perch house plan reusable on another land?
It can be used as a reference, but the final drawings must change for the exact survey plan, road width, orientation, soil, drainage, authority requirements and family brief.
What drawings should I prepare before building a small-land house?
Prepare architectural drawings, structural drawings, electrical and plumbing layouts, drainage planning, BOQ support and the documents needed for local authority approval.
Next step
If you are planning a house in Sri Lanka, start with a proper site visit, concept design, structural approach and BOQ before committing to construction. Structa can coordinate the architectural drawings, structural drawings, interior direction, MEP drawings and documentation as one buildable package.
Useful next pages: compare Structa design packages, explore our architectural and engineering services, understand the house design process, browse free house design ideas, or contact Structa for a site visit.
Use this guide as general information
Site conditions, authority requirements and construction decisions vary by project. Confirm project-specific architectural and engineering matters with appropriately qualified professionals before relying on them for construction.